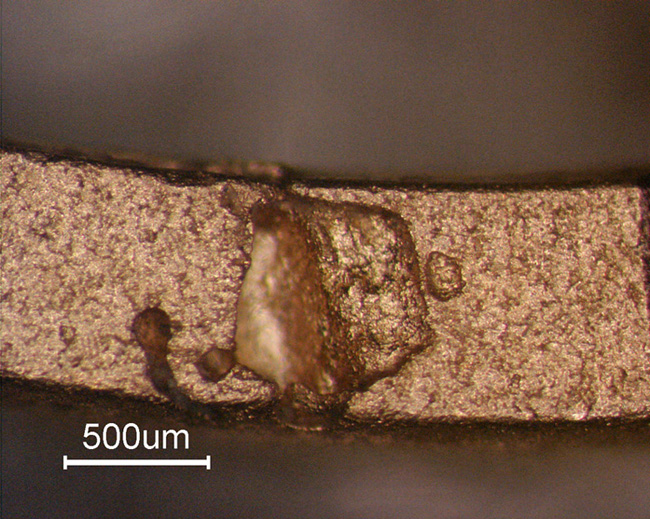
When analyzing surface defects on a lost-wax cast jewelry piece, the most common mistake is to hastily classify them as casting defects linked to the metal. In many cases, however, the source of the problem lies several steps earlier: in the wax injection phase.
Let's examine a real case: a 14ct red gold ring showed some suspicious cavities on its surface. Their appearance was so "clean" and regular that, without an accurate analysis, they would have been attributed to an alloy issue. The reality was different — and the defect would have appeared identically with any other alloy.
The case study: 14ct red gold ring with surface cavities
The ring showed cavities of generally regular, rounded and elongated shape. Even with the naked eye a revealing detail stood out: the inside of the cavities appeared clean, smooth and well-defined, with no traces of contamination or the irregularities typical of casting defects.
What microscope analysis reveals
Observation at progressive magnifications confirms the suspicion: the cavities remain sharp and free of contamination even at high magnification. This is a key diagnostic clue.
A "real" casting defect — caused for example by turbulent fill, alloy contamination or solidification issues — shows irregular internal surfaces, visible dendrites or residues. Here instead the appearance is that of a perfect replica of a convex surface: and that's exactly what it is.
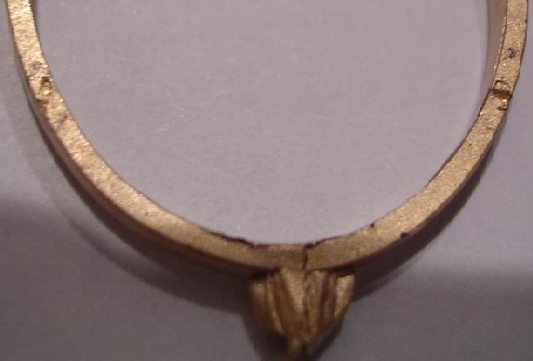
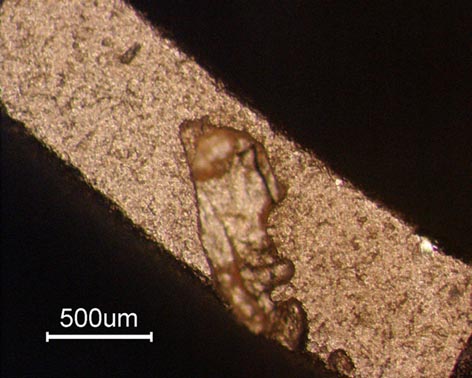
The real cause: air bubbles trapped in the wax
The defect doesn't come from the metal. It is a bulge of the investment that, once the metal was poured, left a negative imprint on the surface of the piece.
This bulge originates from a precise sequence:
- An air pocket forms inside the wax, created during rubber mould filling (turbulent flow regime) or because air was already trapped in the liquid wax.
- Air bubbles tend to settle in the outermost area of the wax, close to the surface. Between the bubble and the outside, only a very thin wax film remains.
- During the vacuum phase on the flask — a standard operation to remove bubbles from the investment — the applied depression generates enough force to break that thin film.
- The liquid investment enters the pocket and fills it, creating a solid bulge protruding into the wax pattern.
- When casting takes place, the molten metal occupies the space originally left by the air bubble, exactly replicating the shape of the investment bulge.
The result is a seemingly "casting-related" cavity that is actually the faithful copy of an air bubble formed many steps earlier in the process.
4 practical solutions to prevent the defect
The good news is that the problem is entirely preventable by acting upstream, during wax injection. Here are the four decisive steps:
- Carefully degas the wax inside the injector. This is the most important step: well-degassed wax contains far fewer air pockets.
- If the injector works under vacuum, apply vacuum in the injection chamber at least once a day — and every time you refill it with new wax. This prevents progressive air accumulation in the molten material.
- Leave the wax under depression long enough to let trapped bubbles rise to the surface of the liquid wax.
- If a vacuum injector is not available, create adequate vents in the rubber mould to let trapped air escape during filling.
Conclusions
When a cast jewelry piece shows surface cavities, before blaming the alloy or the casting process it's worth running a careful visual and microscopic analysis. Clean, smooth, regular cavities are almost always the imprint of air bubbles formed in the wax, not actual casting defects.
Solving the problem doesn't require changes to the alloy or the casting cycle: it's enough to act on the quality of the injected wax. A bit of extra care in the preparation phase translates into a drastic reduction of scrap — whatever alloy you're working with.